How to Edit Halachipedia: Difference between revisions
| Line 32: | Line 32: | ||
== How to Create a New Page == | == How to Create a New Page == | ||
<p style="display:inline">Enter the name for a new page:</p> {{#createpage}} | |||
# Unlike most websites whereby you create a new page and subsequently connect the new page to the main site via a link, in a wiki you first have to create the link and then the page. When you create the link, it will be to a blank page. Then when you click on this blank page, it will give you the option of adding content, so that it’s no longer blank.#Therefore, the first thing to do is decide where your halachik article would belong within our topical categories as displayed on the left sidebar. | |||
## For instance, “The [[Laws of Shema]]” would fall within the “[[Prayer]]” category. | |||
#Next, you need to create the link. To do this, click the edit tab towards the top of the page. From here you’ll see a large editable text box with all sorts of strange looking coding symbols. Find where you should add your link and surround the title with double brackets | |||
## For instance <nowiki>[[Laws of Shema]]</nowiki> = [[Laws of Shema]] | |||
# A red link means that it's an empty page, which you can then click on and add content | |||
== How to Add Content == | == How to Add Content == | ||
Revision as of 05:28, 17 December 2013
YU Students: If you would like to sign up for any of the projects this year. Please see the sign up sheets here.
Step 1: Become a user
EmbedVideo received the bad id "kl6cQvQBbbI?rel=0" for the service "youtube". |
|
Step 2: Learn how to edit

|
EmbedVideo received the bad id "pK9cu6VFYsU?rel=0" for the service "youtube".
|
How YOU Can Make A Big Difference In Only 10 Minutes
- The most accessible and useful job that anyone can do is organize pages. Please pick one page and work on it for 10 minutes, no more, and I'm sure that'll make a big difference. # See this link for a list of pages you can work on: Special:WhatLinksHere/Template:Okay
- Here's an outline for how use those 10 minutes most effectively:
- read the page,
- think about the logical order of the sections,
- reorder the sections,
- create sections that are missing (and leave them blank),
- mark the page's status (see #Page Classification),
- and categorize the page (see #How To Categorize A Page).
- If you are unsure of how to edit the pages - See our help guide above.
How to Create a New Page
Enter the name for a new page:
{{#createpage}}
- Unlike most websites whereby you create a new page and subsequently connect the new page to the main site via a link, in a wiki you first have to create the link and then the page. When you create the link, it will be to a blank page. Then when you click on this blank page, it will give you the option of adding content, so that it’s no longer blank.#Therefore, the first thing to do is decide where your halachik article would belong within our topical categories as displayed on the left sidebar.
- For instance, “The Laws of Shema” would fall within the “Prayer” category.
- Next, you need to create the link. To do this, click the edit tab towards the top of the page. From here you’ll see a large editable text box with all sorts of strange looking coding symbols. Find where you should add your link and surround the title with double brackets
- For instance [[Laws of Shema]] = Laws of Shema
- A red link means that it's an empty page, which you can then click on and add content
How to Add Content
- To make a simple page, there are really only a few codes you should know
- Subtopics have == before and after ==
- Bullet points use the asterisk sign *
- Numbers use the pound sign #
- References require two things:
- Each individual reference needs <ref> before and </ref> afterwards
- And, at the very bottom of the page, you must include: ==Notes== <references/>
Here's an example:
According to scientists, the Sun is pretty big.<ref>E. Miller, The Sun, (New York: Academic Press, 2005), 23-5.</ref>
The Moon, however, is not so big.<ref>R. Smith, "Size of the Moon", Scientific American, 46 (April 1978): 44-6.</ref>
==Notes==
<references/>
An Example Template
<!-- cut and paste the following [[template]] into a word file,
replace any text with your desired text, leave all symbols-->

Write a two sentence introduction-just replace this text with your introduction.

<!--Use the next line of code if you want to insert an image, else erase -->
[[File:name of image file.jpg|thumb|right|''text you want below image'' ]]

== Replace this text with First Section title ==
# Replace with desired text <ref> Replace with desired reference</ref>
# Replace with desired next point text<ref> Replace with desired reference</ref>
# Replace with desired next point text<ref> Replace with desired reference</ref>

== Next Section Title ==
# text <ref>reference</ref>
# next point text<ref> reference</ref>
# next point text<ref> reference</ref>

== Next Section Title ==
# text <ref>reference</ref>
# next point text<ref> reference</ref>
# next point text<ref> reference</ref>

<!--Do not erase the next two lines -->
==Sources==
<references/>”
Transliteration from Hebrew to English
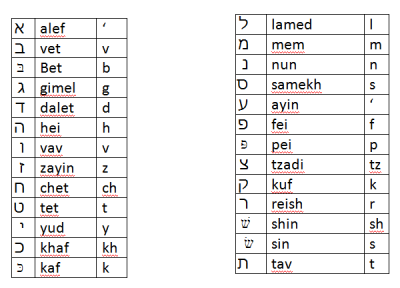
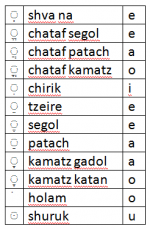
We hope to offer a dynamic interface that allows the user to choose his transliteration or pronunciation style (Ashkenazic, Sephardic) and the text will appear accordingly. However, until we can implement this feature this is what we have:
This issue is troublesome because there is no universally-accepted method. For a brief introduction to the topic there is an article in wikipedia called Romanization of Hebrew. Of the various options, we have chosen to use the "Common Israeli" version, except that the 8th Hebrew letter should be denoted by 'ch'. While this represents the official recommendation of the site, we realize that there are often numerous variations in spelling, some more common than others. We hope to list such spellings at the bottom of the given synonymous page, and to create a redirect page accordingly, and we encourage your help in this regard.
Capitalizing Titles
Halachipedia adopts the "Title case" for its style of capitalizing page and section titles. The rules of "Title case" are as follows:
- Capitalize the first and last word in a title, regardless of part of speech
- Capitalize all words except for articles (a, the), prepositions (to, at, in, with), and coordinating conjunctions (and, but, or)
For example: How to Edit Halachipedia (all words capitalized except “to,” which is a preposition).
See Dailywritingtips.com for details.
Page Classification
To maintain organization for the development of Halachipedia's content, there is a ranking system of pages. Every content page should fall into one of the following categories:
- Stub - The page has less than 3 halacha's.
- Lacking - The page has anywhere from 3 to 10 halacha's.
- Okay - The page still can be improved significantly. Either it lacks content depending on the topic, it lacks structure, or needs updating.
- Good - The page can still be improved. It can have more content, pictures, or organization.
- Done - The page is a finished product. It can only be edited by administrators.
The five classifications will look as follows:
| This article is a stub. |
| This article is lacking content. |
| This article is okay. |
| This article is good. |
| This article is complete. |
To implement this classification, simply put one of the following lines at the top of a page of content: {{Stub}}, {{Lacking}}, {{Okay}}, {{Good}}, {{Done}}
Please help us implement this classification system. We can utilize this classification to devote our attention to the pages which need the most help, by seeing the following lists:
- Special:WhatLinksHere/Template:Stub
- Special:WhatLinksHere/Template:Lacking
- Special:WhatLinksHere/Template:Okay
- Special:WhatLinksHere/Template:Good
- Special:WhatLinksHere/Template:Done
Overlapping Content
If content is relevant to two separate pages, our goal is to make the content available to users whichever page they are reading. If one of the pages is the primary one and the other is secondary, the content should be written on the primary page and the secondary one should just have a reference to the primary page. On the other hand, if the halacha is very relevant to both pages, it should be included on both pages. However, the pages should be coordinated so that changes on one page also appear on the other. The current solution is to use templates. To do this, create a template and insert the halacha and the relevant footnotes into the template. Then include the template whether it belongs.
For example, see the template for Writings on the Side of Pages: Template:Writing_on_the_Side_of_Books. Here are the pages where it is included:
Other Templates
Incomplete Sections
To indicate that only a section is lacking use: {{SectionLacking}}. This is displayed as follows:
| This article section is a stub. |
Missing Source
If a halacha is missing a source, it should be marked clearly so that it can be corrected or removed quickly. It is included with the following code:{{NoSource}} and it displays as follows:
EVERY HALACHA ON HALACHIPEDIA STRICTLY REQUIRES A SOURCE. PLEASE ADD SOURCE HERE, OTHERWISE THIS HALACHA WILL BE REMOVED.
Questionable Page
Use this template if a page has very questionable content or a topic that does not belong on Halachipedia.
It is included with {{QuestionablePage}} and it displays as follows:
Until legitimate sources have been added for each halacha, please note that the halacha's without sources on this page may be questionable.
Ibid in Sources
Ibid is discouraged because of the inflexibility it causes to the growing site. This template is included with the following: {{Ibid}} and it displays as follows: Ibid
Reference Columns
Pages that have a lot of sources could look nicer with 2 column or 3 columns. This is currently implemented on the Tefillin page and Chol HaMoed page. It is included by replacing <references/> with {{Reflist|2}} or {{Reflist|3}}.
Currently, we're using reference highlights with a little CSS to make it easier to find which footnote you are up to. See the Mediawiki:Vector.css page for that code.
How To Categorize A Page
The categorization system is very useful for organizational purposes. At the bottom of every page should be a category link. All you have to do is add the following at the bottom of a page: [[Category:Category_Name]].
The next question is how to create a Category. Simple.
- Go to the following URL:
- Click the Create Tab (top right)
- Type {{cat main}}
- Save page. Done.
Here's an example of a Category page:.

